


A persons eyes,
Blue, black and brown
Draw me in…
Are the key to reading deep into their soul,
and reveal secrets never told.
A persons eyes,
twinkle with joy,
when they dream fearlessly
about a world of infinite possibility…
A persons eyes,
roll in circular motions at an awful joke,
when they are not impressed.
In the same way that they avoid eye contact,
when they are lying or depressed.
A persons eyes,
Blue, black and brown
Draw me in,
then slowly drift apart…
Until next time.
When I search for the right set of eyes,
to feel whole again.
***
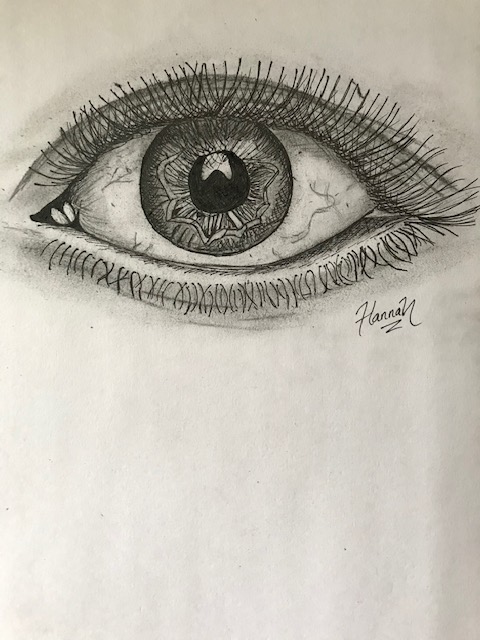
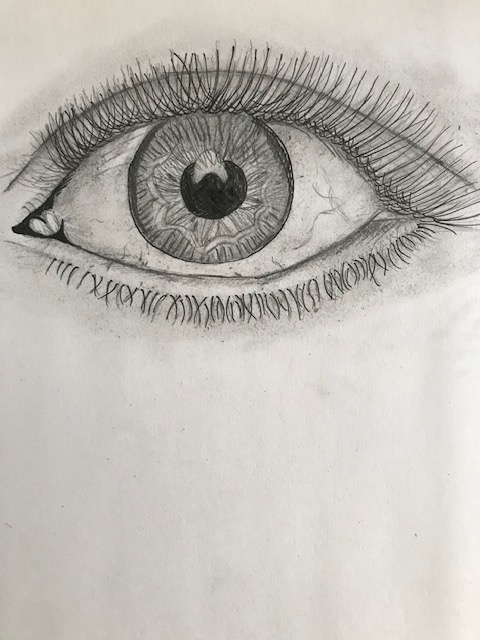
Sketch #1: the ‘realistic’ eye
As my life begins to get busy again with increased work commitments, I find myself facing an internal battle against time to put together the artistic creations that make up this blog. Thus, instead of my usual style of A3 and A2 canvass prints, I thought that I would revert to a sketch book project. I have never had a sketchpad for my art and the thought of having a diary full of illustrations, where I can track my progress by turning pages, has me excited!
About the art:
I am quite an unconventional artist, in the sense that I tend not to draw lines and sketches. Instead, I simply get stuck in with a pencil and rub out where necessary; a bit like a trial and error process. Nevertheless, I always do my research beforehand. Google images, Instagram and Pinterest are great sources of inspiration for art. Facebook has some good art pages as well, with YouTube videos to demonstrate the process of drawing.
My top tips for drawing a realistic eye:
- Ensure that you have an image of an eye in front of you, as this will assist in providing an idea as to how to structure the shape of the eye, determine the length of the lashes and gain perception on how the light touches it.
- Use all (or as many as you can) of the different shading pencils. For this artwork I used 2B, 3B, 4B, 6B and 8B. This is essential for creating depth, contrast and shadows, through the use of light and dark tones. I used 8B, which is the darkest pencil in my collection, for the eye ball and lashes. 3-4B will do for the shading of the eyelid. 2B can be used for the initial sketch and outline of the eye. If in doubt, test the pencils on a separate piece of paper. For added depth of colour, I went over the darkest parts of this drawing using a black fine liner pen, which makes the eye stand out on the page.
- Be sure to use a rubber/eraser! A rubber is the perfect tool for erasing the spots where you want the light to show – for me, those light spots were the centre of the eyeball, to show that the person is looking into a source of light, as well as the inner under eye (lacrimal papilla/waterline), which makes the eye look bigger, due to providing a contrast to the shading on the eyelids. Erasing parts of the eye provides such a wonderful and exquisite contrast to the deeper tones, and is a must-do to achieve the perfect eye look. A white gel pen or tipex pen would work well too. Alternatively, you can use white paint, but ensure that the paint brush that you use is incredibly fine for precision.
- Use your fingers (or a small, dry sponge) to smudge around the eyelid and create a realistic shading effect for the outer skin around the eye. I also used this technique underneath the top lashes, to provide the illusion of a shadow created by the eye lashes.
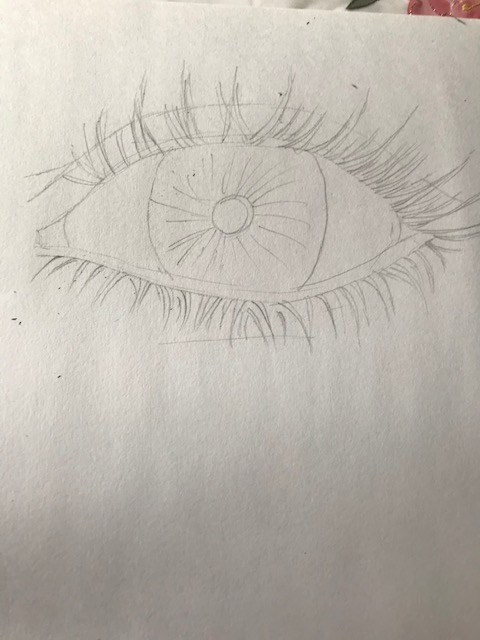
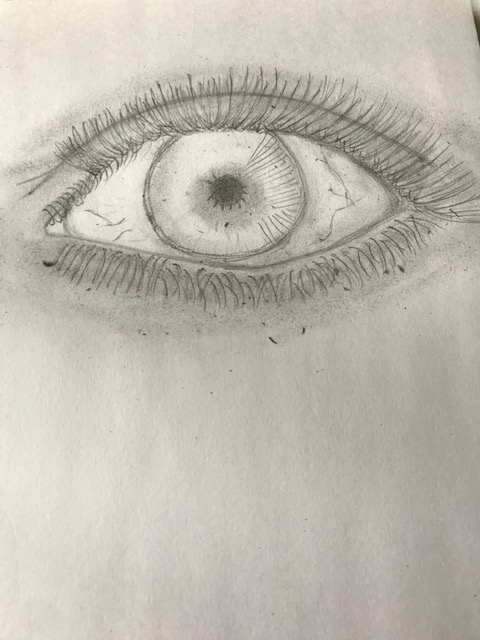
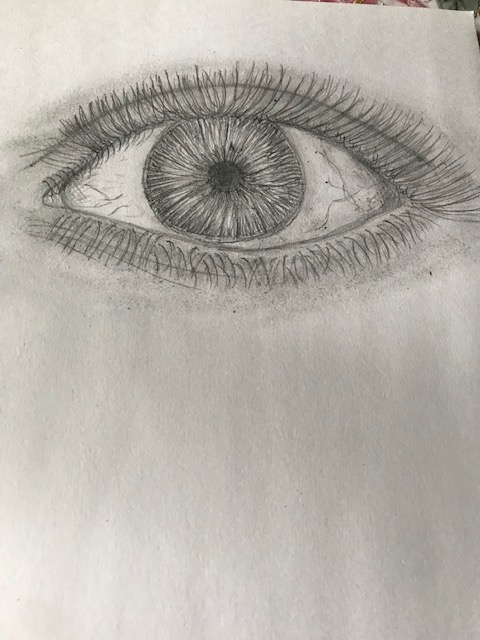
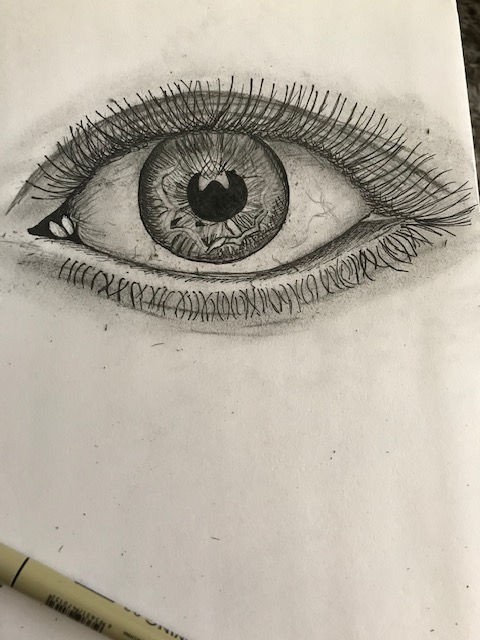
The artistic process has also been demonstrated for you, by the photos below (my video wouldn’t upload). As you may have noticed, my sketch wasn’t perfect to begin with and I made alterations to the eye shape/added extra details throughout. This is an example of how you shouldn’t be afraid to have an attempt at art, as you can learn so much throughout the process.

I hope that this post has inspired you and uplifted your spirits. Please feel free to mention my blog in any eye-related artwork, if you choose to draw one of these yourself, and let me know if you found the tips helpful 🙂

Beautiful drawing.
LikeLiked by 1 person
I’m so glad that you like it, thank you very much 🙏
LikeLiked by 1 person
Welcome 🙂
LikeLiked by 1 person
🙂🙂
LikeLiked by 1 person
Its really beautiful!!!! You are so talented!!! Keep shining .😄 and the poem was amazing as well….
LikeLiked by 1 person
Aww thank you so much, that is so kind of you! I hope that you have a lovely weekend 🙂
LikeLike
Thanks and same to you..❤
LikeLiked by 1 person
💖💖💖
LikeLike
Heyyyy, I norminated you for the blogger recognition award…. congratulations 🎈
https://creativemay.com.ng/the-blogger-recognition-award-im-so-excited-%ef%98%86/
LikeLiked by 1 person
Thank you so much I shall check it out 🙏
LikeLike
Your art work and writings are verb superb!
LikeLiked by 1 person
Thank you as always for such kind words! ❤️
LikeLike
Always
LikeLike